1935 Bugatti Type 57S Compétition Coupé Aerolithe

What a treat today has been!  Drove to the High Museum of Art Atlanta to see the Dream Cars collection exhibition, which will continue until September 7, 2014.  If you get a chance to make the drive, I highly recommend it.  A total of seventeen concept cars are on display each magnificent except for two turds.  Both German – one, a BMW and the second a Porsche.  Oh well, can’t have it all I suppose.

So I’ll start by listing what I thought was the most impressive in the collection:  a 1935 Type 57S Compétition Coupé Aerolithe.  The finish of this car is a shade of very light green metallic that exhibits properties akin to a chameleon:  one moment it looked light green, and the next it became almost silver.  And yes, this is the Bugatti with the exposed backbone assembled with hundreds of rivets.  Feast your eyes…

IMG_2293

The front of the car displays an immense amount of exceptionally perfect chrome.  The grill has what appears to be thermostatically controlled vertical blade arrangement allowing the correct amount of cool air to keep the engine from overheating.  The headlights were particularly impressive:  everything was crystal-clear except for the bulbs: they were yellow.  The side vents on the hood were also flawless and the latches holding the sides were magnificent.

IMG_2312Moving right along, notice the doors.  What a door!  Check out how high the door sills are and the teardrop design of the side glass window.  The occupant’s shoulder would be even with the lower edge of the window – how awesome is that?  Finally as if it were not obvious enough, those are suicide doors held in place by two delicately made door hinges.  To make something look this simple and elegant takes an obscene amount of knowledge, craftsmanship and time.
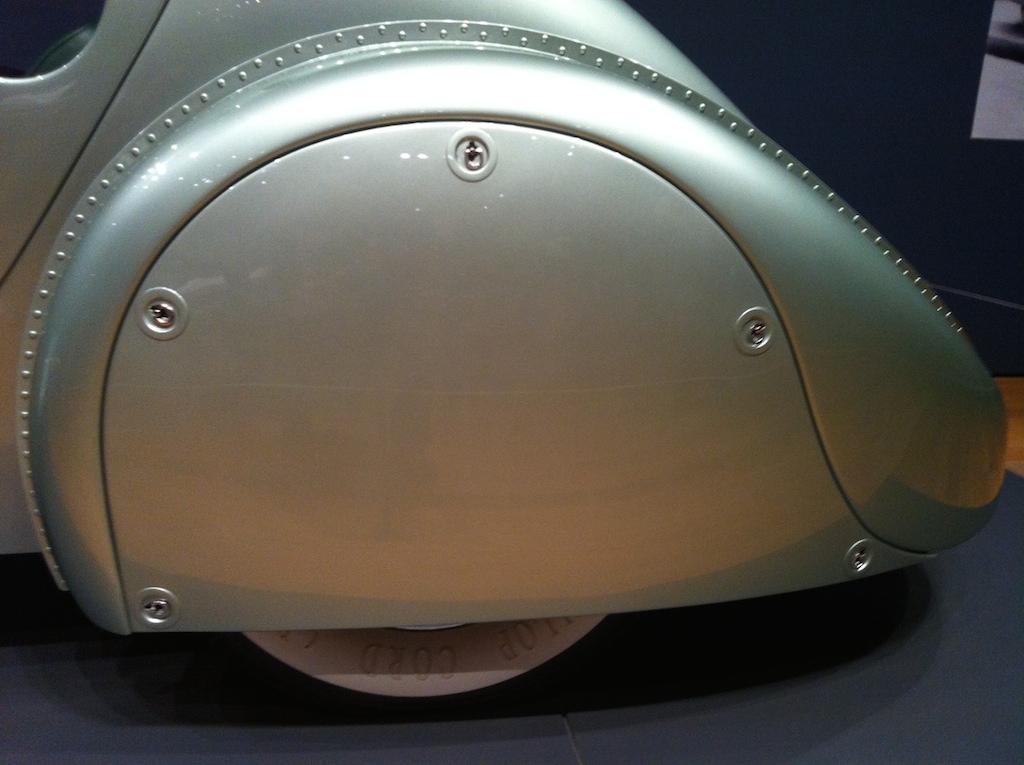
IMG_2319Here is a closeup of the rear wheel cover.  The cover has five fasteners that when turned in the correct direction allow the cover to be removed.  Pay close attention to the lower right corner where the wheel cover meets the rear curve of the fender.  The amount of detail is immense.  The cover has a compound curve – it boggles the mind how this the master craftsman in charge hand-formed this from a sheet of metal using his hands, an English Wheel, perhaps a planishing hammer…  And it goes without saying, but look at all those rivets holding the fender to the rest of the body.

IMG_2320The tail of this Bugatti is once again an amazing work of art.  Here we see the exposed backbone with all those alternating rivets.  The spare wheel must be under that large round cover.  Notice how perfect the sweeping seam on the fender meets the backbone in the middle.  Finally, below the roll-pan are four very tastefully placed indicators.  They are just neatly tucked away as to not distract the eye from the flowing curve of the back of this work of art.  Amazing don’t you think?
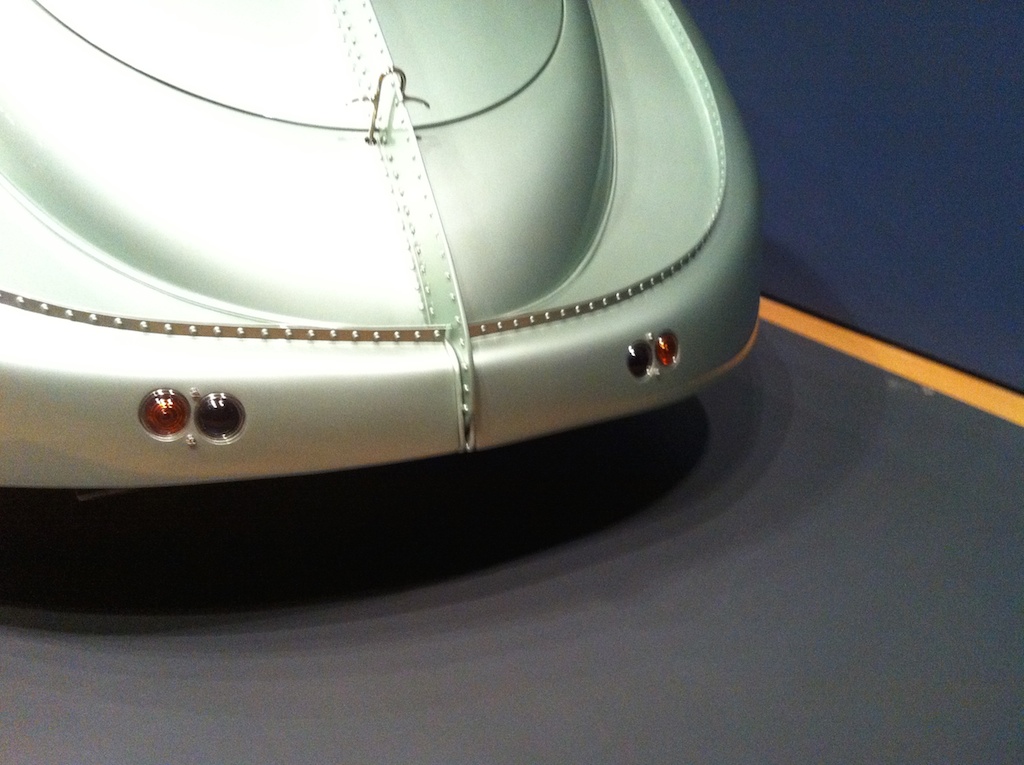
IMG_2323Here you see the four lights I mentioned before, but wait…  Look at that simple but elegant chromed release handle for the boot cover.  It appears to be designed to be lifted and then pulled back where it would rest on a detent.  Then the entire back cover would open.

IMG_2325This picture shows the exposed backbone actually goes under the car for a certain distance.  I was unable to get a closer look but I think there are even more surprises under all the shiny bodywork. If you look close enough towards the left, you see that small tapered point on the wheel cover that shows just how high the level of detail exists on this coachwork.

IMG_2326Here are the back windows.  Unfortunately the light was not good enough to show the interior, but from this vantage point I could actually see all the instrumentation as well as the dash and steering wheel.

IMG_2322I realize this is not exactly the best of photos, but look at how the door extends into the roof area of the car.  I suppose this would have aided the occupant when entering/exiting the inside of the car.  Nothing seems left to chance here.  Exceptional, don’t you think?

IMG_2300

IMG_2302I took the two pictures above, to highlight something particular about this car.  The entire body is a flow of curves.  The long swooping fenders, the compound curve of the rear wheel cover, the roof, the curves on the rear deck…  Except for one thing…  Look at the extreme sharp edge on the engine cover as it meets the firewall.  Then think when this was all formed:  the mid 1930’s.  This is not a car – this is art.

Finally, I’ll just close with a few more pictures of this exceptional rolling masterpiece.

IMG_2294IMG_2298IMG_2295Stay tuned…  I took many pictures of the rest of the cars in the collection.  I’ll try to write about them in the next few posts


The Chevrolet Cameo Pickup

Back in the mid 1950’s, the Chevrolet Cameo pickup was the first of the high-end luxury trucks with real pizzazz.  Thanks to the knowledge General Motors obtained from the plastic-fantastic Corvette, the Cameo’s outer bed panels were made of lightweight fiberglass.  At the time the Cameo came equipped with a high-end interior, the best of V8 power, automatic transmission and two-tone paint.  In the 1950’s this made the Cameo a very avant-garde vehicle, and thus not many were built.  Even more obscure is the GMC version – the Suburban Carrier.

Today, the Cameo is very rare.  Today, I had the privilege to work on one (again!) – oh lucky me!!  :mrgreen:

In a none-too-distant-future this Cameo will be a stablemate to my friend Barry’s Bel Air (click here to see it).  What makes this Bel Air so damn special is that it has been in Barry’s family since new.  Just imagine still owning the car you grew up since you were a kid!!

This Chevrolet Cameo has been at my cousin Jim’s shop numerous times on its way to being brought back to life.  Jim has modified the frame, installed the new LS 5.3 liter engine (oh hell yeah!!) and done a huge amount of other fabrication work.  I have written about it before; you can read more about it by clicking here and here.

Today we did some bodywork on the fiberglass outer bed panels.

IMG_2150

Body filler applied to the “low spots”.

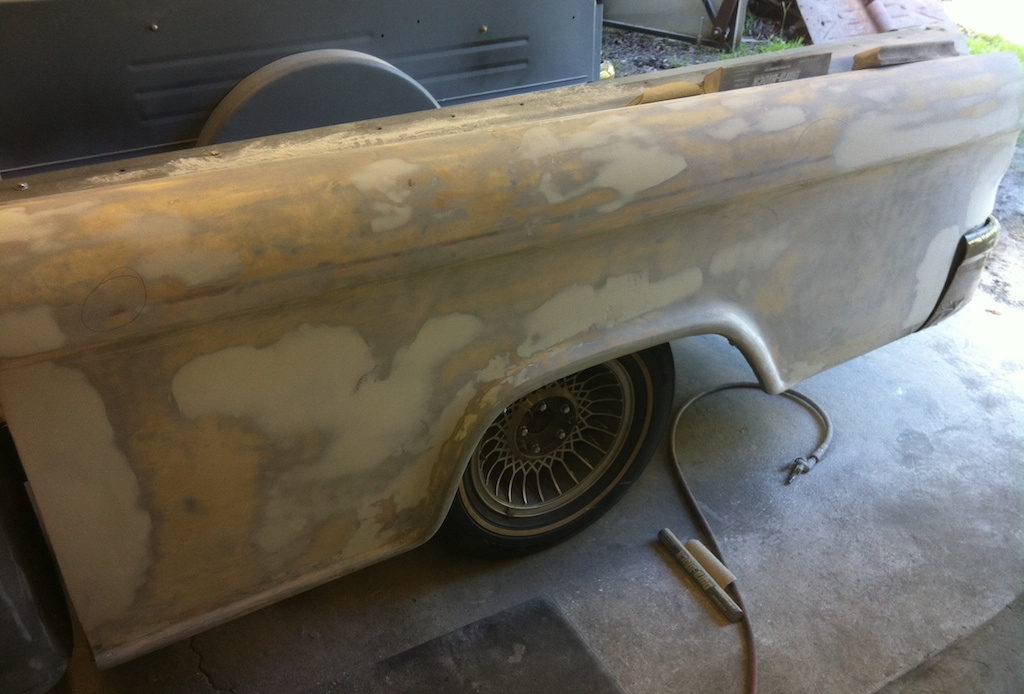
To get the bed panels nice and straight, my cousin Jim previously sprayed them with sanding primer (the gray stuff) and today we worked some body-filler in order to ensure a very straight finish.  Body filler is applied to the “low spots” on the panels.  The great majority of this will eventually be sanded down.  This takes patience and a steady hand.  Yes it is tedious, it is messy (you get a ton of powder all over the place) and it takes time.  And time.  And more time.  And yes, you guessed it, more time.

I’ve had quite a bit of stress and aggravation in the last few weeks, so working on Barry’s truck today was very therapeutic.  This is the kind of stuff that “builds character”.  It gives you time to think and well…  I just enjoy doing this!

Sanding was done using an orbital air-powered sander, several sanding blocks of different shapes and sizes and different grades of sand-paper.  Of course this is July 4th weekend and it was nice and warm (no – it was HOT!).  Fortunately we had a few box-fans running and this made it tolerable.

Some folks say this is boring and a pain in the ass.  Nope.  This brought back fond memories of the endless hours I spent the summer I did this very same work on bowtie6 (click here).  What made the Cameo different was that the sanding had to be more careful because I did not want to dig into the fiberglass gel-coat.  After several hours we had this:

IMG_2159

The end result, after a few hour’s worth of sanding.

What is left now is just a film of filler covering the “low” spots on the body panel.  If you look closely you can see some of the sanding blocks (on the top of the bed and on the floor).  We had air-powered versions too but this has to be done the old-fashioned way:  by hand.

Here is the cab on Barry’s cameo (yes, the photo is not perfect, I used my iPhone!):

IMG_2149

The Cameo’s cabin.

IMG_2151

The opposite side, after sanding was completed.

So what’s next?

Well…  We have some more sanding to do.  There were a few spots that needed some more filling and further sanding to get really, really smooth.  Then another coat or two of sanding primer followed by more sanding with even finer sandpaper.  The idea is to get the surface straight and smooth.

Man!  This was fun today.  If you have never done this kind of work before, you are missing out on one of the pure joys of auto-restoration.  I highly recommend it!

How is it done?

Filler is mixed from a paste in a can.  Usually you would get about a golf-ball sized amount and add a pea sized amount of catalyst.  This is then mixed very quickly on a special pad lined with paper until thoroughly blended.  Then the fun begins.  You must spread this with a special pad thin enough and quick enough while it is still malleable.  After just a few minutes there is a point-of-no-return when the stuff gets too hard and grainy.  On a hot day like today, the set time is even shorter.

Then, the filler is allowed to fully harden.  Once it is hard to the touch, one can start sanding.  The end result is a very fine powder that goes everywhere.  Yes, it has a special odour and when I say it goes everywhere I really mean it.  However, there is nothing like the feeling of accomplishment when you take an air-hose and then gently rub your hand on the body panel.  If you have done it right, it will be as smooth as a newborn’s arse.

I’ll have more updates soon…

Audi Transporter

On the way back from a quick visit to Costco this morning, I saw this new car Audi Transporter parked in an empty lot.  I thought it was pretty cool how these new Audi vehicles get transported in the safety of the white car covers.  Wonder if you spend the hard-earned cash for one of these gems you get the cover thrown in the deal?  Granted, it isn’t much of a car cover but it does have a certain “cool factor” to it.

I also found it ironic the proletarian Volkswagen loaded on the tail end of the transporter did not get the VIP treatment 🙁 – see below…

IMG_2105

The lowly VW just got a hood and trunk protector.  Oh well…

MTM Hydro Professional Foam Lance Review

From what I’ve read on the auto detailing forums, the MTM Hydro Professional Foam Lance is the only way to properly wash a car.  This device is attached to your pressure washer and with the right kind of soap, a perfect layer of foam can be delivered to the surface of your car.

I did some research on the inter-webs and found there are several vendors.  Since I am not endorsing one or the other, I picked the one with the lowest price (and yes, they vary!) so if you decide to get one do your homework.  Sure enough, a few days after I placed my order the friendly UPS driver delivered a package with an MTM Hydro Professional Foam Lance and on Memorial Day weekend I decided to try it out.  Here is what I found…

What You Get in the Box

So what do you get in the box after in return for your hard-earned $79 bucks?  As you can see from the featured image, the box is nicely labeled and the contents are:  a lance assembly, two fittings, a clear plastic tube and the plastic bottle used to hold an auto soap mixture.  The clear plastic tube siphons soap mixture from the plastic bottle.

IMG_2046The lance is quite heavy and appears well made.  This picture shows the lance with the clear plastic siphon tube attached on the bottom;  on the right is the fitting that matches my pressure washer.  The top knob regulates the amount of soap mixture being sucked in and the black lance on the left works just like the tip of a pressure washer:  it regulated the sweep area (from a fan to a concentrated point) by turning one way or the other.

The bottle looks like this.

IMG_2047

The Pressure Washer

I have a Sears gas-powered pressure washer, like this one:


From what I have read on the forums, finding the “right” fitting to match your trigger is a bit confusing.  Fortunately in my case, the correct fitting came in the box.  Here is what the MTM Hydro looks like with the proper fitting for my pressure washer:

IMG_2044This part was rather frustrating for me.  I tried several times to contact one of the vendors about the fittings and after several tries finally received a rather vague answer on whether the MTM Hydro lance would fit the Search trigger mechanism.  However all worked out right out of the box.

Using the MTM Hydro Professional Foam Lance

Once I got everything assembled and had the pressure washer up and running, let me just say this thing works very well.  Since I am doing a full report here for you, I will explain the good and the bad.

First, let me tell you the bad:  the Achilles heel of this whole affair is the bottle.  It is very cheap and flimsy.  During transit the box appears to have been bumped a bit and the bottle showed signs of being semi-crushed.  Look at this picture:

IMG_2049I tried to straighten out the crease a little, but this bottle is made of such thin material that I am afraid to mess with it too much in fear it will just out rip.  Another issue I find in the bottle is that when it is full of soap mix, it is extremely easy to cross-thread on the lace.  This is what the threads on the bottle look like:

IMG_2052

And they thread into this:

IMG_2054However, if you take your time then you can get the bottle properly screwed in.  Bottom line, I see myself having to buy a replacement bottle sometime in the near future.  So it might not be a bad idea to get an “extra” bottle with your order.

Next the good:  this thing works.  But… Be aware the amount of foam will depend to a large extent on the quality of car-wash soap you use.  My first attempt was using Griot’s Garage car-wash:

IMG_2043And this is what it looks like after a minute or two after applying:

IMG_2038 IMG_2039 IMG_2041This soap gave good results.  I had two other bottles of car-wash I had previously bought at the local Auto Zone and those failed miserably producing almost no foam at all.  I realize there are probably better car-wash shampoo options out there, I’ll just have to find them.  When I do, I’ll have an update.

Oh and one more thing:  Keep an eye on the bottle as its contents get used up… 😉  In my case, the pressure washer had enough suction that it started to crush the bottle like an empty beer can.  Just watch the soap mixture!

In Conclusion

The foam lance worked very well.  It produced a very nice layer of foam and overall I was very pleased with how my S2000 and later, bowtie6 looked after all the foam was rinsed away.  Was it worth having to break out the pressure washer and all its attachments?  I guess I’ll have to try this out a few more times before I can say for certain.

1967 Honda RA300 F1 Car

HondaRA300

The V12 powered, 1967 Honda RA300 F1 car – spectacular, don’t you think?

Check out the exhaust headers, isn’t that a work of art?  Somehow, I do believe that even though my Honda S2000 only has one-quarter of the cylinders, there is some of the RA-300’s DNA in it somewhere.  After all, up until just a few years ago the S2000’s F20C engine was the most powerful normally aspirated engine per liter of displacement available.

It is sad that modern Honda Motors is so far removed from their rich heritage of F1 racing as shown in the image above.  Unfortunately all Honda makes these days are mini-vans and economy boxes.

Than again…  You never know…

The planets are slowly aligning themselves again over at McLaren.  First, Ron Dennis has made a much-needed return to re-organize the F1 Team.  Second, Honda is making a return to F1 in 2015 supplying engines to the McLarn F1 Team.

So, today on what would have been the eve of Ayrton Senna da Silva’s 54th birthday one can’t feel but optimistic that indeed the glory of yesteryear might return.  With some luck, who knows…  Maybe some of that glorious magic of the MP4/4 or MP4/5 might return.  Maybe from that Honda might start making real cars again, like the S2000 and NSX.

Finally, check out these videos.  They speak for themselves!

https://www.youtube.com/watch?v=jKQfcaYJyXk