Category Archives: Cars

1980 Corvette

img_2349
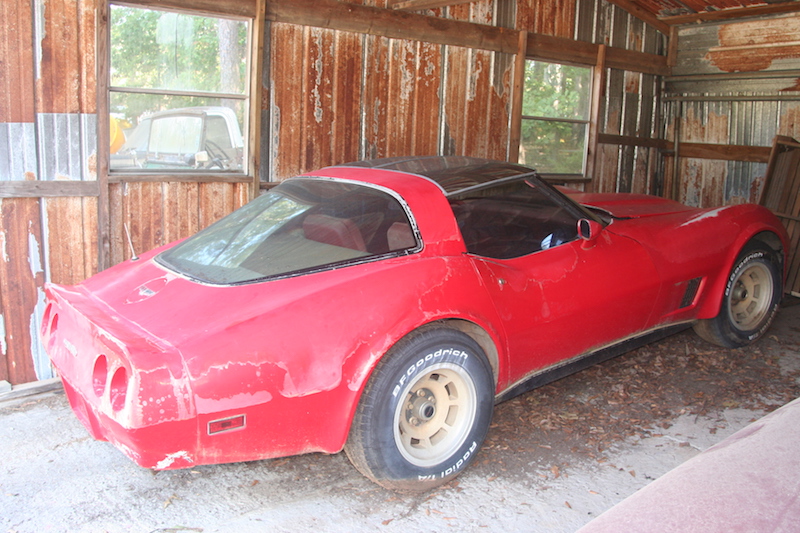
I am constantly in search for a new restoration project and this weekend I took a closer look at this 1980 Corvette.  According to the owner, it has  been stored for a decade and is in need of serious restoration.  Yes, it is a basket case but…  It is a C3 Corvette and it is red!

The 1980 Corvette is not known for anything close to “high performance”.  Instead, this is the start of the last body change for the C3 Corvette.  For 1980 through 1982 Corvettes, the nose received a re-design as well as the rear fascia modifications.  Regarding the engine, well, that is another matter completely.  These poor cars became neutered victims of government emissions restrictions and thus, the California equipped engine produced something like 180hp, the standard engine produced 200hp and the high-performance version did at best a whopping 220hp.  Oh how things have changed in 35 years; contrast that with my 2014 Camaro packing 400hp of electronic fuel injected power.

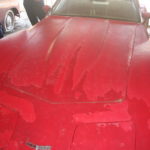
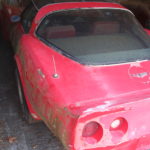
So what do we have here?  According to the build decal on the driver’s door,  this car is vintage October ’79 production of a 1980 Corvette.  The paint is past its prime, the interior is nasty and the engine is not original.  I have no idea how the engine is because it is not running.  This is an automatic transmission car and it has power widows.  The red paint is very faded but I think it must be the original color because there is not evidence of any other color in the jams.  I tried to look for the plaque with the color code but did not find it.

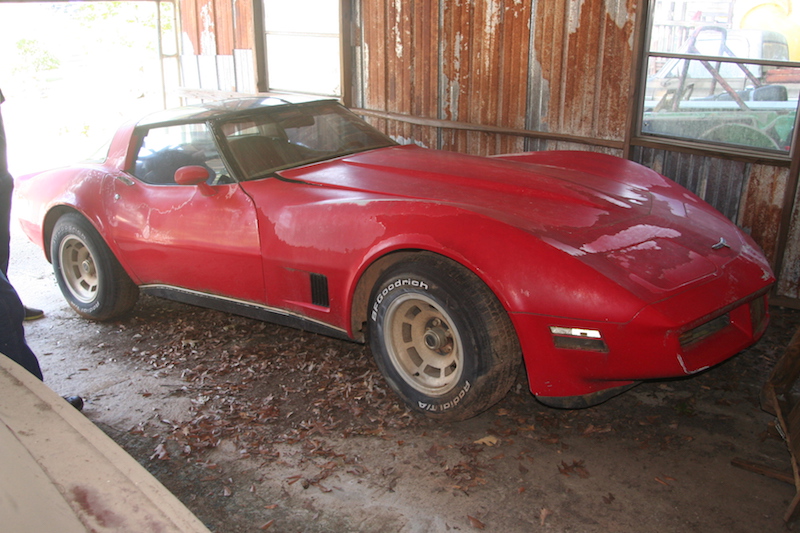
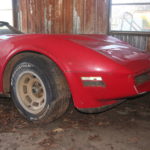
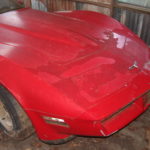
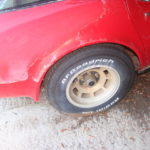
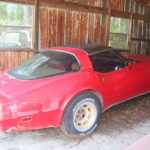
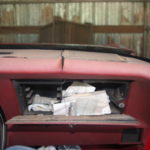
In other words, this 1980 Corvette is in need of a full body-off restoration.  However, as the following photos will show, there is some good:  wheels are original aluminum options, it has original T-tops and the body panel gaps (especially the hood) fit exceptionally well.  I found the spare tire and all glass is intact including trim pieces.
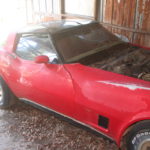
Front Nose

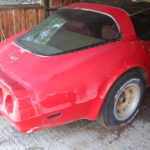
Since this is a 1980 Corvette, the nose section features the improved aerodynamic design.  In my opinion, it is easier on the eye but not as nice as the chrome-bumper version.  I suppose this is a plus for this Vette.  You can also see what I mentioned earlier, the body gaps are all very nice indeed.  Just by looking at the surface this indicates no earlier collision damage, otherwise why would all this fit so well, right?

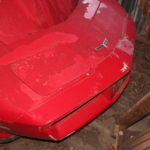
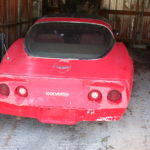
Rear and Side Panels

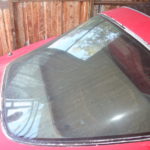
The rear of the car also fits well.  The plastic tail lights show some serious discoloration and weathering but the rear glass is in good condition including the rear de-fogger.  The black trim is all in place, but it has peeled a little on the driver’s side.
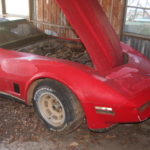
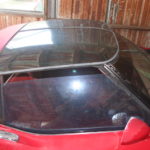
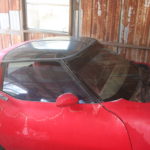
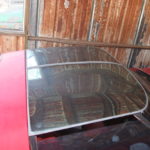
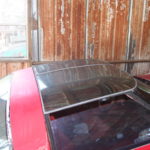
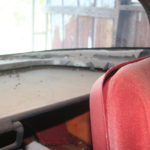
T-Tops

Oh yes!  T-tops are de rigueur on a C3 Corvette and this one has T-tops.  I did not see any damage to the T-tops although I did not try to remove them.  There is no telling how long ago it has been since they were last removed.
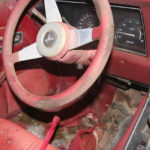
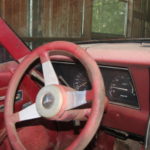
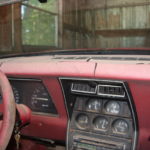
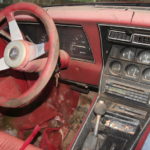
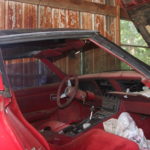
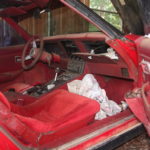
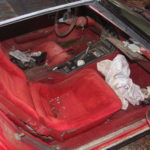
Interior

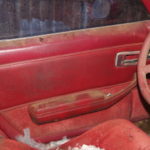
And now really ugly part:  the interior.  This poor Corvette has not been treated very nicely and consequently the interior is in very poor shape.  The carpet is expired, ditto for the seats, door skins and dash.  The console is also in poor shape.

The knuckle in the tilt steering is broken as well as the outside plastic trim on the steering stalk.  I am not sure if the cloth seats are “original”, perhaps they were re-upholstered at some point in time but they will need full restoration – they are nasty!.  Funny thing though… If you look inside the glove box, on the left are slots for 8-track tapes.  Gotta love the 70’s!

What Next?

A basket case like this is not a deterrent to me.  After all, when I first purchased bowtie6 many years ago, it was in very bad shape.  Prior to bowtie6, I restored a 1984 Jaguar XJ6 which I drove with Corvette LT1 power for 16 years.  It too, was in bad shape.  Finally I have my cousin Jim’s machine shop and his ability to restore cars.

Since the engine is not original in this 1980 Corvette, my plans would be to replace it with a new LSx engine with a matching automatic transmission.  My preference is always a 6-speed but that would need a new pedal box and that would add complexity.  In my opinion the existing engine is just not worth it; instead an LSx will offer enough power to make this Corvette perform to modern standards.

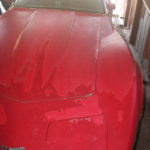
Paint and body work don’t scare me either; I have access to paint guns, and a paint booth.  Granted, I have never worked on a fiberglass body but the fiberglass on this car does not show any serious cracks or missing pieces.  There will be a great deal of work preparing the body for new paint but that is mainly hard work and patience and even more hard work.  Finally, there was a little damage to the tip of the edges on the hood near the windshield, but I can almost assume this is a common issue with these cars.

When we inspected the car yesterday, the area under the windshield wiper mechanism looked in very good shape and there was no evidence of poorly repaired collision damage.  Again, the body panels fit very well.  I also inspected the inside of the rear fender wells and there was no evidence of rust.  The rear roll-pan where the spare tire does not show any collision damage either so all-in-all the car looks solid.

One more concern is that both door latches did not work so well.  They appear to be gummed up because the mechanism did not release very well.  The door latches did release but not smoothly.

The interior will be the most challenging aspect.  I did notice the speedo looked odd.  From what I have researched Corvettes of this vintage had the dreaded 85 MPH speedometers installed.  This one did NOT have that; it was a normal speedometer.  Not sure what that means, perhaps this is because it is an October 79 production run.

The seats seem to be intact but the outside cover trim pieces are cracked.  I am not sure what availability of these pieces will be.  As for the rest of the interior, well I suppose that will need patience and a lot of work.

In Conclusion

I did not make an offer on the car.  Unfortunately the owner did not have a clear title and without that, I will not buy the car.  However I think there is potential.  Needless to say, we did not talk money yet but I am sure this car can probably be purchased at a low price.

OK.  I am a firm believer in buy the best car you can find.  However in a case like this, there is potential and if I were to buy this for a reasonable price then all for the better.  These are not super desirable C3’s but this is a C3.  I have always liked the aero treatment and I think they just look bad ass…

Finally I am going to reach out to you and ask for your opinion.  If you have owned (or currently own) a late C3 like this and would like to add any words of wisdom, please let me know in the “Comments” section below.  I also would welcome any advice on what you would consider a reasonable purchase price.

I have seen so many pictures of late C3’s this weekend my head is spinning!  And what makes this so hard to figure out is all those pictures are stunning!  A 1980 Corvette rebuilt is a looker for sure!

Thanks and look forward to any info, suggestions, etc.

img_2354


1937 Railton Special Limousine by Rippon Bros Coachbuilders

1937_Railton_12One of the featured cars in the August 2016 issue of Hemmings Sports & Exotic Car magazine is a 1937 Railton Special Limousine by Rippon Bros Coachbuilders.  I had to do a double take when I saw the article because several years ago, I was able to photograph this very car.

But first, what exactly is a 1937 Railton Special Limousine?  This particular car hails from an era where a customer could have a car built bespoke to their specifications.  This Railton’s body was aluminum, made by one of England’s premier coach builders – the Rippon Brothers.  Matter of fact, Rippon Bros also built bodies for Rolls Royce.  This car was built for Reid Railton who was at the time, a land-speed record holder.

1937_Railton_11I had a chance to photograph this gorgeous car at a gathering of Hudson automobiles.  The event took place at the then owner’s home and there were numerous Essex-Hudson-Terraplanes on display.  But… What does this have to do with a Rippon?  You see, this limousine is powered by a Hudson engine!  Matter of fact Rippon cars were powered by Hudson engines and this was not the only one in the collection.  I’ll have more posts about the others soon…

Back to the 1937 Railton Limousine…

1937_Railton_02As you can see in this picture, the back seat has access to a pull-out table.  Each side featured a lift-top with compartments for many things…  On one side a fully stocked bar with crystal and barware necessary for making cocktails along with compartments for cigars ; on the other side a vanity, with mirror, hair brush, comb, and aspirin bottle.  There was even a center compartment with silver plated affairs to hold various snacks and sweets.  And that was just the start…

1937_Railton_03The rear trunk area includes custom fitted luggage!  That compartment at the very top, included plenty of tools all neatly arranged in their respective locations.  That trunk lid is special…  Note the part with the corrugated rubber – that is there for a reason:  it is designed for adults either standing or seated.  But why?  This car could also double as a shooting-brake and yes, it has a “secret”, water-tight compartment designed to hold shotguns.  I also remember seeing under the front seat several drawers containing an assortment of fuses, spark plugs, spare light bulbs, etc.  The dash also had a pull out map tray.  There was nothing left to chance here.

The chrome work around the front grille and emblem is something else!

IMG_3839The article in the issue of Hemmings Sports & Exotic car magazine mentions this car is now part of the Gilmore Car Museum (Hickory Corners, MI) and was transferred there by the car’s previous owner, a Hudson collector by the name of Eldon Hostetler.

These pictures were taken when the car belonged to the owner prior to Mr Hostetler at his residence in Greenville SC.  If memory serves me right, this was in the summer of 2006.

Finally, I do remember this car as being gorgeous but at the time was not in “museum quality”.  According to the article in the magazine, the limousine went through an extensive restoration and won numerous awards.

1937_Railton_081937_Railton_05

Further Reading

Conceptcarz.com article about the 1937 Railton Limousine – there are interesting pictures here.

LaVine Restorations article about the 1937 Railton Limousine – apparently the Limousine underwent restoration by this company and there are very nice pictures on this link.

1937 Railton Limousine at Pebble Beach Concours d’Elegance – this link opens to a beautiful photo collection from Ryland Scott Photography at the time the Limousine was shown a Pebble Beach in 2011.

Special Feature at Hemmings website – this link opens the article at the Hemmings website about the 1937 Railton Limousine.


VW Buses

IMG_3763

VW Buses – imagine the possibilities!

On day way to lunch today, I saw a car transporter parked in the turn lane and it was hauling three vintage VW buses.  Why?  The driver was heading into the Mickey Dee’s – matter of fact, I pulled into their parking lot to take these pictures.

The white VW bus on the top left appeared to be a cobbled up affair – it had what appears to be homemade hinges on the side windows to make them swing out.  The next one to the left still had windows in their fixed positions.

IMG_3764

The green/white one was the best of the bunch…

The best one of the bunch was the one on the bottom slot.  It even had what appears to be some nice vintage mag wheels.  However I was not able to really tell if they were the real coveted VW buses with all the opening windows.  Suffice to say, somebody had 3 diamonds in the rough here.

Oh and to boot, check out what was at the very rear…

IMG_3766

The bonus 1963/64 Impala coupe

This appears to be either a 1963 or 1964 Chevrolet Impala coupe.  Again, plenty of potential there, don’t you think?

Iconic 1989 BMW M3

IMG_3577

The real deal – an M3!

The latest vehicle to arrive at my cousin Jim’s shop is this iconic 1989 BMW M3.  For a 20+ year-old vehicle this one is in remarkable shape traveling (according to the odometer) slightly over 80,000 miles.  However, rust has no mercy and is relentless in attacking all sorts of vehicles regardless of their desirability.

The owner of the M3 brought the car to Jim in the hopes of having several rust spots repaired on the roof, in the area ahead of the opening for the sunroof.  In addition, the battery box – located in the trunk of the vehicle – has some rust issues also.

IMG_3564

The iconic 1989 BMW M3 with its distinctive fender flares

So this is what the roof of he car looks like.

IMG_3566

Rust damage ahead of the sunroof opening

By now you are wondering how would the roof rust in such unusual spot and with such weird pattern.  Turns out, if you zoom in on the picture close enough one can see the slight evidence from where one of those popular 80’s and 90’s sunroof wind deflectors touched the car’s roof.  Looking at the way pattern of rust holes, there must have been some sort of flaw in the way the wind deflector was installed and this caused the paint to wear down to bare metal.  Once that happened, moisture seeped in and the rest is history.  In addition, the area where the rust resides in is close to the sunroof drains.  This must have been packed up with debris at some point in time, and this also contributed to the vast amounts of rust.

Unfortunately, damage is not confined just to the top.

Rust formed on the inside seam of the sunroof as well as on the bottom of the sunroof tray, all located towards the front of the car.  This is going to be a difficult repair, because of the intricate shape and patterns that will need to be made to make the new repair patch panels.

Next, we have the battery box, and this one is indeed interesting!  Here are a few pictures…

As you can see from the pictures above, there is a fair bit of damage.  To make things worse, the owner had cut a piece of plywood and had glued it to the rusty floor. This only trapped moisture even more making things that much worse.  So, how did so much rust accumulate on the floor of the battery box?

These two pictures are from the driver’s side area behind the rear wheel.  This is basically the same place where the battery box is on the passenger’s side.  As you can see, there is a trim piece still in place and it has a rubber hose attached to it.  That is the drain for the sunroof channel.  All sunroofs have at least one.  As advanced as the engineers were that created this “ultimate driving machine”, the completely missed creating a backup plan.  Yes, a backup plan.

If you look very close at the photo on the right (see above), you will see there is water in the floor of that cavity!  So, even with the drainage hose properly attached, there is a place for water to accumulate and what is deplorable:  there is no drainage hole for the water to escape out of.  Very poor design indeed.

And finally, a couple of pictures of the 4 cylinder engine everyone gets a hard-on about…


Holley EFI Terminator Kit

I’m not very keen on endorsing products but, I will make an exception for the Holley EFI Terminator kit.  At my cousin Jim’s shop is Wayne’s 1956 Chevrolet 210, restored sometime in the 1980’s with a nice paint job, interior and a crate engine.  Wayne wanted something more reliable and fuel-efficient, so the old carburetor got ditched and work started to help bring this American icon back to life with modern EFI.  The centerpiece of all the new parts and today’s topic is the Holley Terminator EFI kit.

IMG_2458

Wayne’s 1956 Chevrolet 210

A new, fuel-injection compatible fuel tank with high pressure fuel pump, replaced the original tank.  The fuel pump kit included a special cylindrical shape sock made of a material that resembles a loofah sponge; this prevents sloshing and erratic fuel gauge readings.  Pretty cool stuff.  This was then plumed forward to the engine compartment with new stainless tubing.  Nice and tidy.

The Holley Terminator EFI kit comes packaged in a large box including all the bits needed to replace an aging carburetor.  This includes a device that resembles a 4 barrel carburetor but with all the necessary sensors needed by the EFI controller.

IMG_2473

EFI Throttle body – note the 2 injectors and Throttle Position Sensor (TPS)

So essentially this is a Throttle Body Injection (TBI) kit.  You can see in this picture the four butterflies, the two fuel rails and two of the four injectors.  These injectors are special in that they spread a very fine mist below the butterflies that bust up fuel into a very fine fog.  There is a throttle position sensor (TPS), manifold absolute pressure sensor (MAP) and an idle air controller (IAC).  This whole affair sits on top of the intake manifold with no changes.

efi-controller

Holley Terminator EFI Controller (from the Holley website)

In the box is also a high quality wiring harness with first-class connectors and very clearly labeled wiring harness; wide band oxygen sensor and engine coolant temperature (ECT) sensor.  Several plastic bags are also included with just about any bolt and transmission linkage adapter one could ever need.  Finally the centerpiece of the kit:  the Terminator EFI controller and hand-held interface.  This is the same controller used by NASCRAP these days except that instead of four injectors, they use eight.  This controller can also be configured to run 4, 6, 8 or 10 injectors so this makes an excellent choice for other projects.  :mrgreen:

IMG_2472

GM HEI distributor

The Terminator controller provides the ability to also control timing provided the a suitable distributor exists.  In this case, Jim installed a GM HEI distributor with new custom-cut spark plug wires.

Configuring the EFI Terminator and First Start-up

IMG_2474

Holley EFI Terminator hand-held interface

This is where the Terminator kit really shines.  To kit comes with a joystick driven interface used to navigate a simple menu driven configuration.  The interface gets connected to a special port in the harness and enables the user to configure the controller as well as for monitoring real-time the sensors.  Prior to startup, the “Wizard” option enables input of engine-size, cam-profile and distributor type.

IMG_2476

Throttle linkage and MAP sensor

Next, the Throttle Position Sensor (TPS) requires calibration.  Using another configuration menu option in the handheld interface, the throttle linkage gets cycled twice.  This action tells the controller the range of motion of the TPS.  The goal is to have the range of motion between 0% and 100% and this is easy to read in one of the “MONITOR” screens on the hand-held interface.

Once initial controller configuration is complete, it is time to start the engine.  Part of the built-in logic of the controller is the ability to “prime” the intake manifold by cycling the injectors depending on readings from all sensors.  This prevents flooding.

In our case, it took a few tries but eventually it fired off and ran very strong.  After a few minutes at idle the controller went to closed-loop.  Next on the configuration process we had to set timing.  This required revving the engine to approx 2000 RPM’s and shining a timing light.  The HEI distributor needed a minor adjustment enabling the RPM’s shown on the hand-held interface to match the reading on the crank.  At this point, the distributor could be locked in place.

Concluding initial setup required setting the idle speed.  This step calls for selecting the “MONITOR” option and reading the idle air controller (IAC) value at idle.  With a few tweaks of the butterfly adjustment screw we set the IAC value in accordance to the instructions.

Now What?

The next step requires taking the car out on the street.  We are not ready for that just yet because the interior must be put back, instruments installed and so forth.

Overall the Holley EFI Terminator kit is impressive.  Installation is very straightforward and the hand-held interface foolproof.  Yes, it is very “basic” (more on that in a minute) but it gets you going with very little confusion. One thing I did not like is the flimsy and diminutive plug used to connect the hand-held interface to the main harness.  It is very delicate – perhaps a more robust connector could have been used.

The documentation provided in this kit is excellent.  Somebody took their time writing this and Holley structured the start-up process in a very well-organized and detailed way.  There are plenty of pictures and diagrams especially of the menu-driven interface configs.  This instruction manual deserves careful reading because there is a lot of information.

Another very big plus about this system is the ability to control electric fans.  The controller is capable of running one or two electric fans.  The hand-held controller also allows setting the “ON” and “OFF” temperatures for fan operation.  In this installation because of space limitations there was room for only one fan.  The preset temperatures were left alone:  fans turn ON at 195 degrees and they go OFF at 180.

As if this were not enough, the controller can also be connected to a laptop!  The software is available for download from the Holley website and requires a USB cable.  In this case the cable gets connected directly to a port on the controller.  According to what I have read, this is how more complex and detailed configurations get selected.

I’ll have more details on how the rest of the configuration goes once the car is ready for the road.