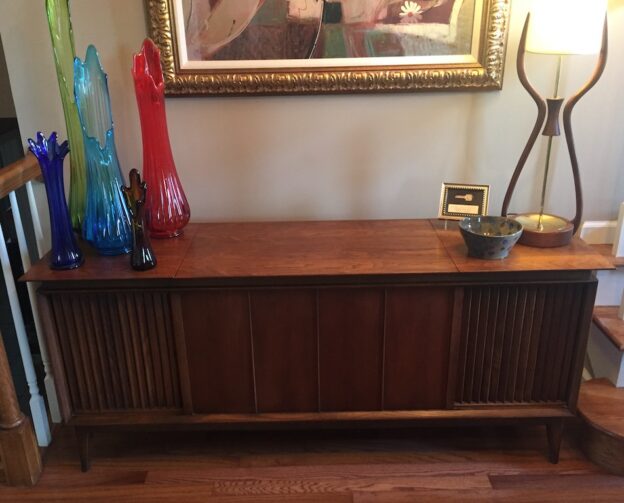
The restored vintage stereo console is finally complete. I’ve been working on this thing on and off for way too long. I am very happy with the results and the console is working as it was originally intended albeit with much more modern components. Let me show you what I’ve done…
If you are interested, click here for the prior article about the vintage stereo console. But essentially that article talks about how I removed all the original components and ended up with an empty cabinet.
Speakers
The original console had raw drivers inside each compartment on either side of the cabinet. I was going to try to source new drivers but instead, my friend Jeff gave me a pair of vintage Polk speakers he no longer used. They took a little finagling to get in but they couldn’t have been a better match.
 The speaker wires are cheap; this is not a reference system so I did not splurge on exotic oxygen-free copper wires with silver soldered ends. However, I did get some nifty banana plugs from Amazon. They have a screw-on design and worked very nice. They were super easy to install, without the need of a soldering. Those are two-way Polk speakers by the way.
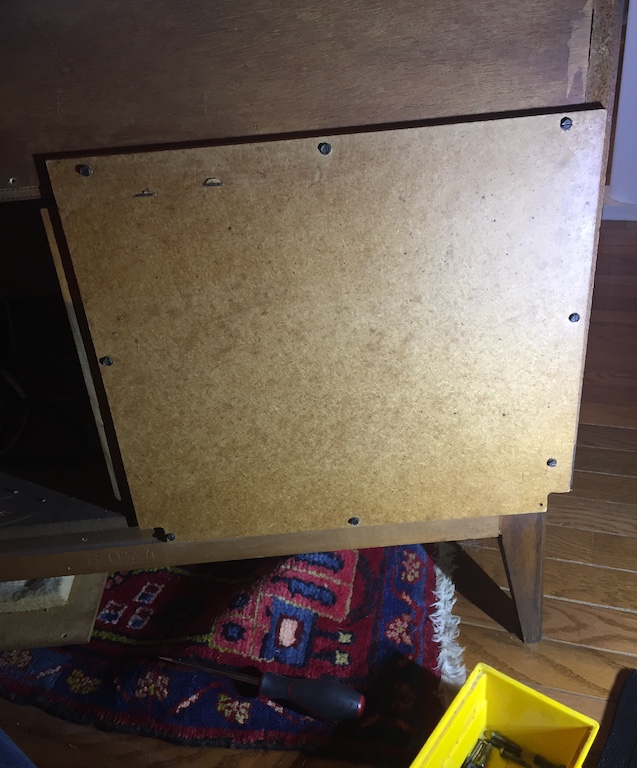
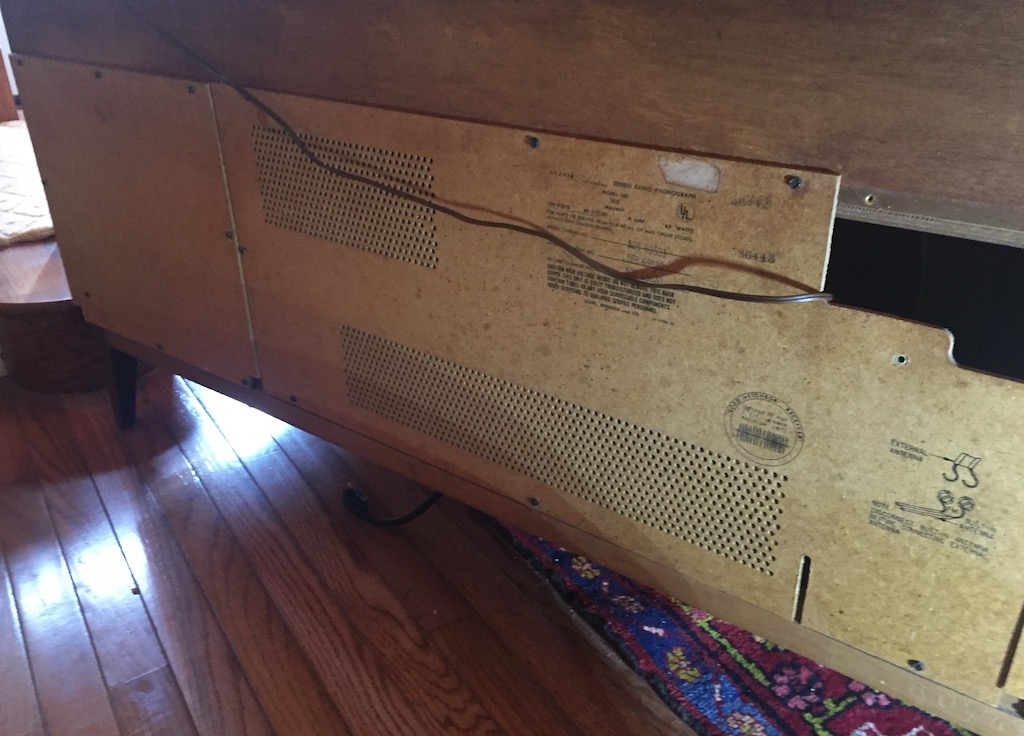
And from the image above you can see I put the original backing material back on. This did two things: it improved bottom end on the speakers a little bit and it also makes the console look finished. So both sides of the rear of the console are covered. Here is the other side:
 And the side and center back panels…
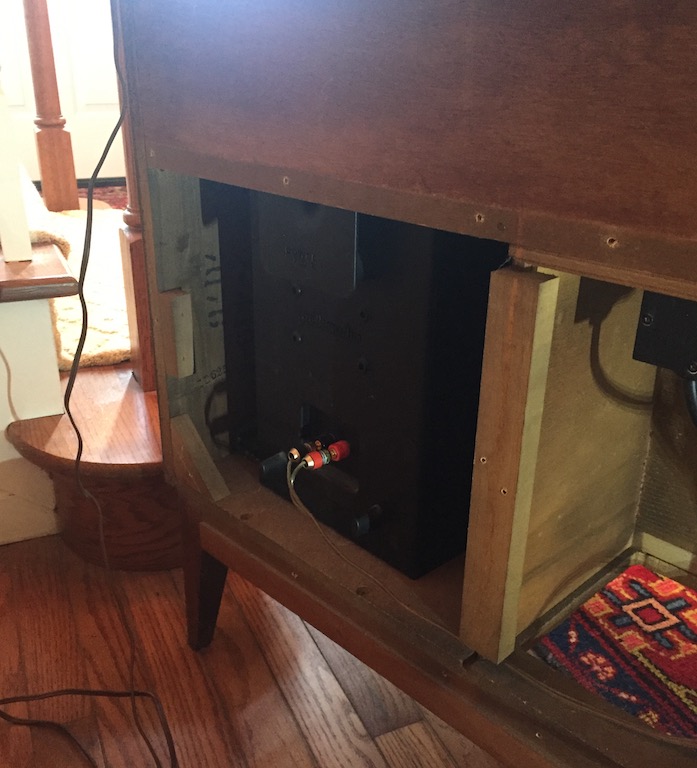
The Components
Now let me show you what runs the whole shebang…
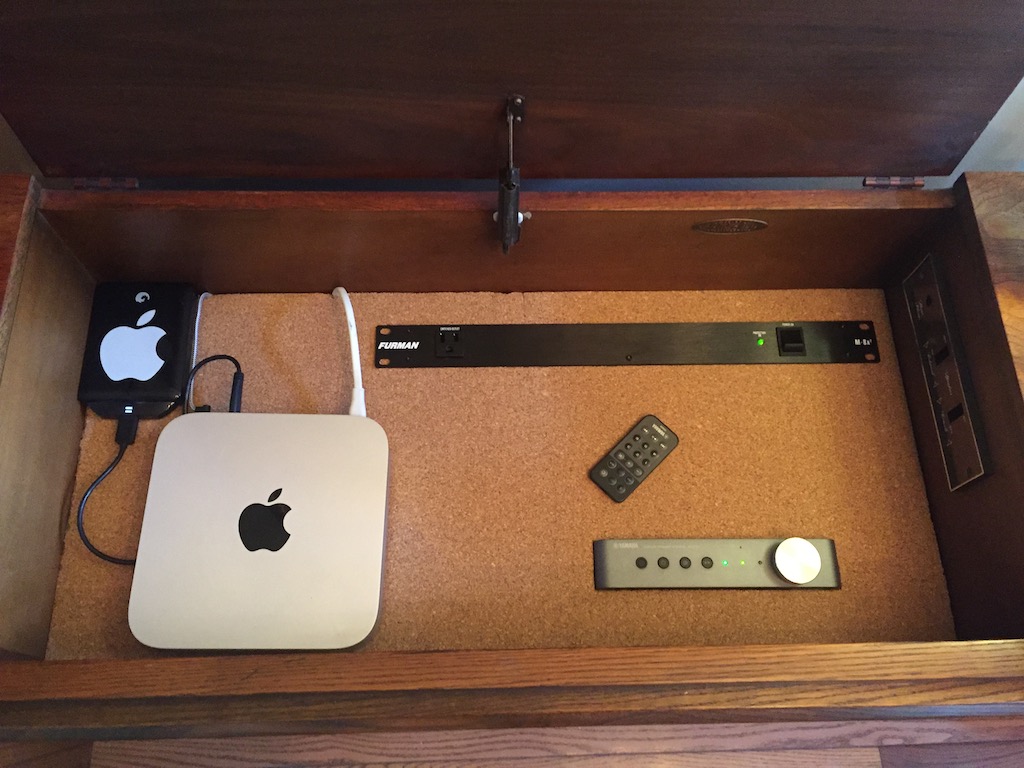
I cut a piece of MDF to serve as the new shelf for all the goodies shown above. I used MDF because it is cheap and I had some left over from when I built my new nifty worktable (i’ll have more about that in a later post). There is a brace you can’t see in the photo above so the new MDF shelf had to be cut about 1/8 inch short on all sides in order for me to get it in the console’s cavity. This left a rather ugly gap on each side, so in order to cover it all up, I just used adhesive-backed cork drawer liner. I bought that from Amazon too and it worked out just fine. It was easy to cut and since it bends easy, I could cut it as long as I needed.
The Power Supply
So what do we have here? At the very top is a Furman power supply. I wanted this to look as slick as possible and the Furman power supply does the trick. On the back side of the power supply are a number of power outlets all fed from one heavy gauge wire that plugs to the wall outlet. This way there is only one plug to deal with. Another cool feature is the single power button that if needed, shuts power off to all plugs. It is all fused and overall it is very well made. Mounting the power supply required cutting a hole in the shelf and then sliding it in.
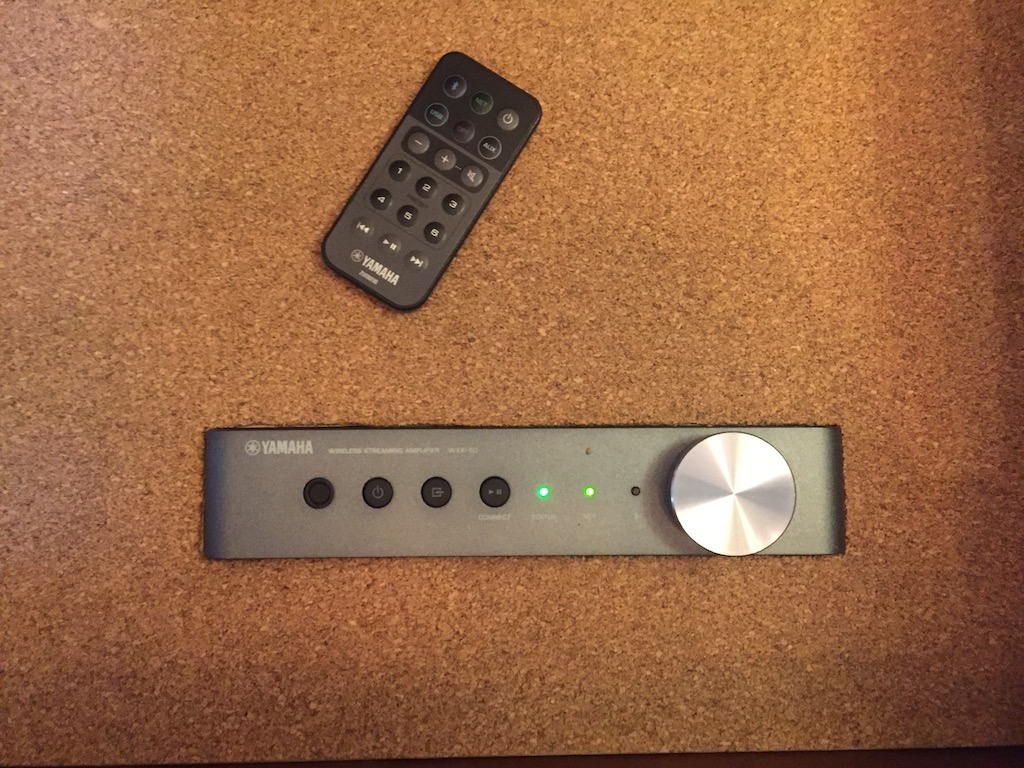
The Amplifier
Next is a Yamaha WXA-50 Wireless Streaming Amplifier. I chose this because it has a built in amplifier, bluetooth, digital input, optical input, remote control and has its own app that can be used from an iPhone or iPad. However all this does not come cheap. The WXA-50 is rather pricey, but it is the perfect fit for what I wanted to do here. The WXA-50 sits vertical as you can see. I had originally mounted it flat but it took up too much space and did not look good. To get the WXA-50 to stand vertical, I had to build a small box underneath the shelf. This took some effort because it had to be done around the ventilation panels of the amp. Once I figured it out though, the amp slid in place and all is good.
The Media Server
Finally, I have my old macMini acting as media server. I have my entire music library stored there and it is accessible from either my iPhone/iPad or from my macBook via remote desktop. This means that I can play my entire iTunes collection from the macMini through the WXA-50. I suppose the macMini could have been installed underneath the shelf but that proved to be problematic in case I need to access it. Plus it just looks cool in the current configuration.
Remember I said there is an app? The app is called Yamaha MusicCast. Once you get that all configured, you can link it to your SiriusXM account, play any radio station on the internet and many other sources. The WXA-50 is a very nice piece of equipment indeed.
I had originally wanted to slide a vintage amplifier (say, something like an old Marantz) but there is just not enough space. And, there would be no bluetooth, XMRadio, etc. Instead, what I have here is just perfect. The system is not overly loud and serves exactly what it was meant to be: a very pleasant way to have background music playing in the background.
Finally, if you notice on the featured image above, there is a small framed key… It is special and fits nicely with the mid-century theme going on…
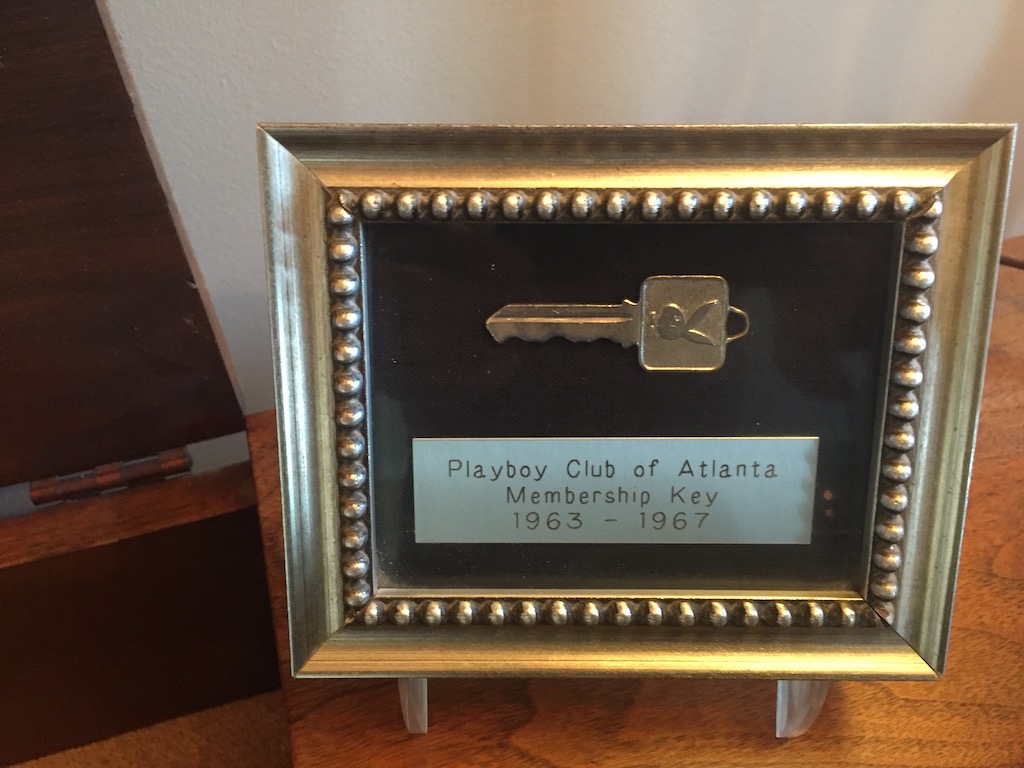
This is a legit Playboy Club key that used to belong to my father-in-law. Good times!
Just need a phono preamp and a turntable to complete the “console”.
Indeed! Thanks for the comment!
I have to say I was a bit disappointed in the “modernization” of this cool classic. Bookshelf speakers stuffed into another box and no turntable/8 track/radio bezels really take the nostalgia this console should generate and turns it in to “meh”.
I cant really talk smack though, I have one of these thats been needing a restore for 15-20 years. So, good on you for at least giving it a whirl. 🙂
Hi there Michael Cain,
You know, your remarks made me laugh! Every now and then, I get gems like this…
Here is the part you completely missed: I built the console to suit me and I spent the resources as I saw fit to do so. Knowing you have a console that has been around for – what 15-20 years? – that you haven’t done anything with tells me you either don’t have the talent or the imagination to make something serviceable. I play my console often and have had great enjoyment listening to it in its current form. OH, and as a bonus, I get lots of compliments from guests that visit at my house that get to see and hear it. Is it a first-class, Hi-Fi setup like my audiophile reference system? No. Not even close but for what I built the console for, it exceeds its original components by a large margin. For example, the “bookshelf” speakers alone are so much nicer than the original paper-cone drivers originally in the console.
So yes, “good on you for at least giving it a whirl”. Indeed.
Cheers man!
I am wanting to do the same thing to my 1964 RCA console.
Your finished image shows a small black box with a white Apple logo on it, next to the macmini. What is that box? I sure could like to see what the finished interior looks like. And a description of what wires went where.
Thanks for your pictures and article.
Thanks for the comment.
The black ‘box’ you mention is a USB hard drive – that is where I have TimeMachine backup configured on the macMini.
As far as “what wires went where”… That is hard to answer because that might depend on what your final setup looks like. I mean, this is not rocket science!
Thank you for the detailed steps and photos of your stereo makeover. I have an old stereo in a beautiful walnut cabinet that I originally purchased to use as a TV stand. The unit worked but needed expensive repairs. I’ll keep the quirky-looking tuner unpowered but update everything else.
Found this article looking for info on doing the same to a stereo I just picked up.
Interesting fact about that key: The Hugh Hefner owned Playboy Club did not open until March of 1965. That key is likely from the unauthorized Playboy club that operated in what is now the Clermont Lounge. IMHO what you have is more valuable as the Clermont is a landmark still in operation with some staff there since the 70’s.
http://www.atlantatimemachine.com/commercialbldgs/ponce789.htm
http://www.atlantatimemachine.com/downtown/playboynews.htm
OH! Awesome info about the key. Thank you for letting me know.
What kind of console do you have? My build took a long time but it was a lot of fun. Matter of fact, I’m on the lookout for another one. I just love these things!
Found this while doing research to do the exact same thing. Thanks for a post. Were you able to take any pics of the “box” you made to fit the Yamaha amp?
The console turned out great! I am very pleased with it and as you can imagine, the real trick was to get the Yamaha amp to stand up correctly inside the console. That took a lot of measuring and effort, but at the end of the day worked very well. I do not have any pictures of the “box” – this would depend largely on how you decide to configure your console.
What I can tell you is I made a template out of cardboard, making sure the design allowed for proper cooling and then transferred that design to wood. I used MDF because that is what I had at the moment, in retrospect probably plywood would have been a better material because it is a bit easier to cut, etc.
Now the only thing we need is a video to see / hear this thing in action! I got a kick out of the Playboy access key. Nice piece of history 🙂
Video? I know. I have to get on with the times, huh? Thanks man!
Nice work Joe – as usual!