Category Archives: 2.4L Ecotec

Backfire!

Looks like 2011 ends in a bang.  Literally.

Yesterday morning the sun was out so I decided to take bowtie6 to work.  Unfortunately, I did not press the “Start” button long enough, the engine turned for just a split second and backfired when I let go of the button.  I’ve had this happen twice before with no serious consequences but this time, we had a problem: the “bang” cracked the intake.

There is nothing wrong with the design of the intake or with anything else.  This was my mistake 100%.  I just call this a risk of running non-factory parts.  The new intake is all aluminium; this is what the intake looks like:

We had to make this intake up because there is no room for the original plastic intake.  Actually there is, but it would have required the steering column to be relocated bigtime and it was just not worth the trouble.  The intake you see above is made in several pieces.  The flange that bolts to the head came from GM Performance Parts and is water jet cut aluminium.  This all has to be made in pieces and welded in place as such.  The four intake runners are aluminium tubing, cut and bent to fit the oval ports on the GMPP flange.  They were welded to the flange from the outside otherwise there would be a lot of machining to make the flange perfectly flat again.

The runners then were fitted to a flat piece of aluminium which made the intake side of the long plenum on the top.  There was a bead ran on the inside of that plate.  Then, the rest of the plenum was shaped and welded in place.  The seams were filed smooth and it all looks like one solid piece.  Finally a flange was made and welded where the throttle body gets bolted with four screws.

All good, except that the four runners ended up with a delicate bead around them, on the inside of the intake plenum.  So, when the backfired occurred it caused the seam on number 4 runner to assplode.  Take a look:

Obviously, it doesn’t take much for the thing to have a major vacuum leak and cause the engine to fail to run.  Needless to say, with this crack RPM’s went through the roof!  One interesting thing about all this is the ECM was smart enough to figure this out, and basically shut things down.

The outside of the runners needs to be welded again (duh!).  Had we not had the backfire, this would have not been a problem.  The seal has been flawless but unfortunately the thing just could not cope with the force of the assplosion.  As you can see, the intake has been removed and will be welded back today.  I hope to be back on the road hopefully tomorrow.

Here is a picture of engine-side of things:

Sorry for the picture being so dark, but you can see there is not much distance between the intake valves and the actual intake itself.  Not at all.  Also, the gasket seems out of place because it is not pushed all the way up against the head – in reality it fits perfectly with the intake opening.

No worries though – this should be a quick fix…  🙂


ECOTEC Drive by Wire

All modern GM engines (LSx’s, Vortec’s, Ecotec’s, etc.) use the so called “drive by wire” or “fly by wire” throttle bodies.  Long gone are the days of actuating the throttle butterfly by mechanical means – ie, a cable – from the accelerator pedal to the throttle body.  Instead, the throttle butterfly is now controlled by a servo motor actuated by inputs from an electronic accelerator pedal attached to the ECM.  If you Google any of these terms, you will get plenty of info on how it works so I won’t go into the details.  This hangs up a lot of folks doing conversions and they end up using a throttle body with a cable.  We did not want to go that route.  What I do want to show here is how we solved some of these problems on bowtie6 while still retaining all the electronics.

The following pictures show what the throttle body looks like.  Since we are running a completely different intake manifold from the Solstice, the throttle body is bolted on a special flange on the new intake.  We could have used the plastic intake, but that would have been a major hassle with the steering mechanism.  In front of all this is flexible rubber tubing recycled from the Solstice.  The silver tube midways is the special housing for the MAF sensor and ahead of that (hidden by the radiator and ahead of the rubber bend tubing) is a K&N air filter.  On bowtie6, the air filter sits ahead of the radiator, right behind the factory grille allowing the coldest air to be pulled in.  However, this all comes at a price:  the MAF must be re-calibrated because of all the bends in the airflow.

This is what the whole shebang looks like…
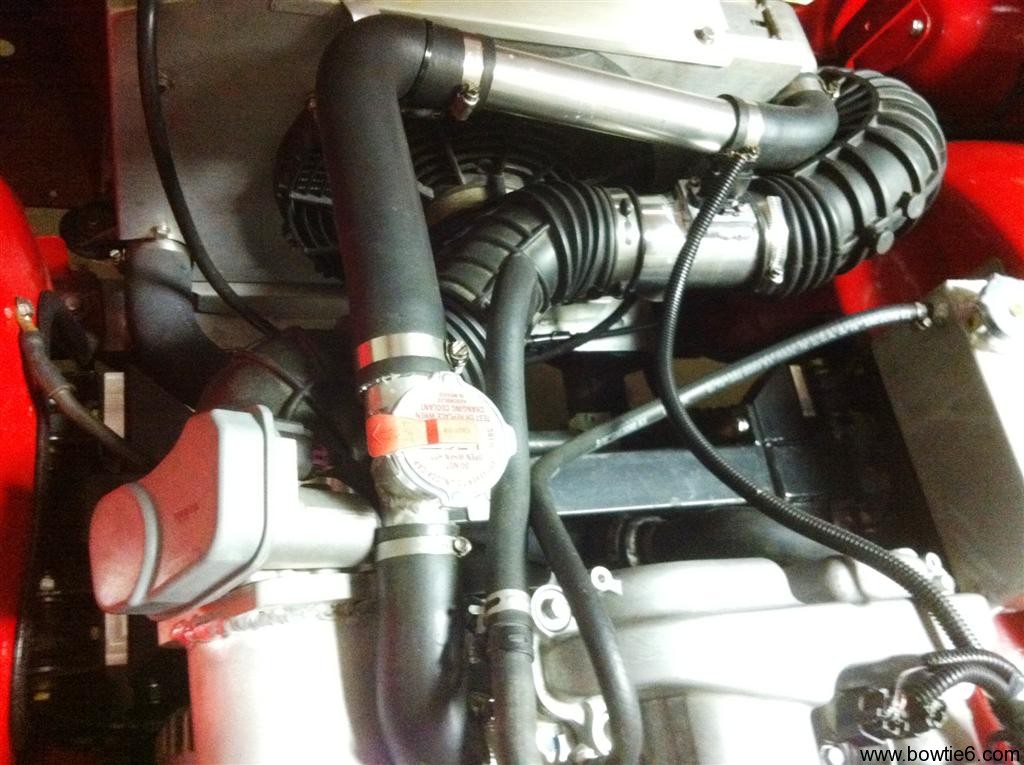
Here is a closeup of the throttle body…

This is the stock throttle body as found in the Pontiac Solstice/Saturn Sky.  The grey plastic cover hides the stepper motor and the rest of the mechanism that opens and closes the butterfly activated by the ECM.  Here is another picture from the back of the throttle body showing the connector plug with the wires coming from the ECM.

Finally, here is what the inside of the throttle body looks like.  I reckon this all could eventually be fully polished, however I have doubts on how great that idea would be and whether there would be any benefit in that.  At any rate, it is what it is…

As you can see, there is no cable.  This is all controlled electronically.  Right before ignition, the engine does a “test” of the throttle body and yes, there is a split second delay.  If you pay attention, one can actually hear the stepper motor in the throttle body opening the butterfly to WOT and then back to the closed position.  Then ignition occurs.

If you are looking at all this and wondering where the traditional Idle Air Motor is then you are correct:  it is not here.  Idle is handled by the ECM and TPS.  From there, the butterfly opens to control idle.

Controlling all this requires the special matching throttle pedal.  Here is where things get interesting.  There are quite a few versions of these throttle pedals.  For example, Vortec engines have a certain version, GTO has another and Vette’s have yet another.  Along with that, some are all plastic, others are plastic with metal arms, some have 6 wires and some have 8 wires.  In our case, we used a throttle pedal used in the 2.4 Ecotec powered HHR.  The advantage of this pedal is that the actuator arm is metal, and thus can be cut and shaped to fit the location where it is mounted in.  This is what the one in bowtie6 looks like:

Sorry for the boring gray background (this is a sound insulating material glued to the Dynamat Extreme prepared body) but thought it be best to take this picture before I install the black carpet.  Otherwise we won’t be able to tell squat of what this looks like.  Some things to keep in mind about what you see above:

  • The pedal is still a little “crude”, if you will.  This is version 1.0 of the pedal.  So far even though it works perfectly there is some issue with the exact angle of the plastic pedal itself.  As you can see it is still a bit too straight.  I am planning to fine tune it by angling it a bit – the top needs to be brought down a little and the bottom needs to come up.  I just need to make up my mind on how far to make the angle.  It is also a bit long.  As you can see the top is rounded somewhat.  I need to make the bottom rounded as well.
  • The “travel” takes some getting used to.  This is a small compromise but this has to be retained because this is the way the ECM is expecting the signal to be sent.  If you look closely, there is a plug at the top with some wires going into a housing.  This is where the potentiometer that translates pedal movement into a signal resides.  This is what tells the ECM what throttle angle is being requested.
  • Looking at the picture above would lead you to believe the metal “arm” hits the red body of the car at the top, right?  Nope.  The travel is not great at all and the arm does not touch the body at WOT.  I also own a 2.4 Ecotec powered HHR and the throttle travel there is equally short.  However, believe me – this is not a problem at all when driving the car.  The throttle has the same “look and feel” as a mechanical system does.  It just takes a little getting used to.

For those of you considering an Ecotec conversion, this is going to be a very important issue to figure out.  Like I said before, there are many different varieties of thottle pedals.  I have read where there are some that are actually meant for the V8’s.  Once you settle on the correct pedal to use, placement will require some adjustments.  Mine is close but not quite 100% perfect yet.

There is yet another alternative and that is to use a Lokar fly-by-wire system.  I think these were introduced at SEMA earlier this year.  I have done some reading about them but I have not seen one in person and have no idea how helpful it would be.  On the downside too is the price – they are quite price.  The stock GM stuff can be had for a few bucks at your junkyard or from auction on eBay.

ECOTEC Fuel System – Part 2

Just a followup on yesterday’s post.  This time, a few pictures of the engine side of things.  Here is the fuel rail, on the extreme right is the fuel inlet and below the rail itself is the loom holding the wires for the injectors.

Here is the fuel supply side.  This one took some doing.  At the extreme lower side (close to the car’s body) you can see the end of the braided line.  That end has a crimped fitting that screws into the stainless steel line feeding fuel from the rear of the car.  That stainless line is held in place by these really cool brackets that unfortunately are not seen.  I’ll have to post about them in a later installment.  At any rate, on the other side of the braided line is another fitting that screws into the solid line shown below.

That line is basically a factory unit that has been modified bigtime.  Ther is a threaded fitting that was silver soldered that allows the braided line to be screwed on.  The reason why this had to start as a factory item is because of the special connector on the side of the fuel rail.  That one clicks into the tube sticking out of the fuel rail.  There is a special took that is used to take that out, by the way.

Finally, on the fuel rail itself you can see the Schrader valve (that black dot) on the right.  This is where you can tap a fuel pressure gauge into, for measuring fuel pressure.  This is all factory items.

Finally, this is what the injector underneath the fuel rail looks like. The rail looks rusted but that is only reflection from the red paint from the rest of the car.  In reality it is quite shiny.  This is number 2 injector going into the head.

And this keeps the engine alive and kicking!

ECOTEC Fuel System

Supplying fuel to the Ecotec required a special delivery system.  Unlike the system we had in place for the V6, the Ecotec is a “returnless” design.  I’ll get back to that, but first let me describe what we had before with the V6.

The V6’s fuel rail required a “loop” for the fuel to flow in.  So a special made aluminium tank was made to fit the stock fuel tank location.  Since we wanted to extend the range, the tank was made larger.  This tank has two bungs, one is an output and the other a return.  The output was connected to an external high pressure fuel pump and plumbed to supply fuel to the fuel pressure regulator and ultimately the fuel rail up front on the engine.  A return line was also plumbed and this dumped unspent fuel back to the tank.  This is a “return” fuel system.

There are advantages to this design.  The pump can be easily serviced and replaced if needed.  However, these high pressure pumps are getting a little expensive these days.  Another advantage is that the fuel returns back to the tank and ensures a fresh supply of “cool” fuel – no vapour lock.  The big disadvantage and something that really screws up folks doing conversions is the tank must be modified (unless specifically designed like mine) to have a return line bung.

The Ecotec however, is part of the new design that does not use a return line.  With this system, there is a single line going to the fuel rail constantly supplying high pressure fuel to the injectors.  This posed some challenges for us.  Since we had made that nice alumimium tank, we did not feel like pulling it out and making a new one with only one output instead of the two used by the return system.

This is what it looks like now:

Whoa!  This looks busy.  Well, let me explain what is going on.  The fuel tank is covered with the black carpet.  At the very bottom, on the extreme right is the former “return” line input.  On the bottom of the tank you see another line feeding the small box on the left.  That is now the supply line into the small box holding the high pressure fuel pump (see picture below).  The fuel pump box above has two lines going up ending in blue fittings.  They supply high pressure fuel into the new fuel pressure regulator and combined fuel filter.  So you see, excess fuel goes back directly to the pump box.  The silver braided line coming out of the regulator feeds a stainless line that runs on the frame and feeds the fuel rail up front with high pressure fuel.  Very neat, and only one line goes forward.

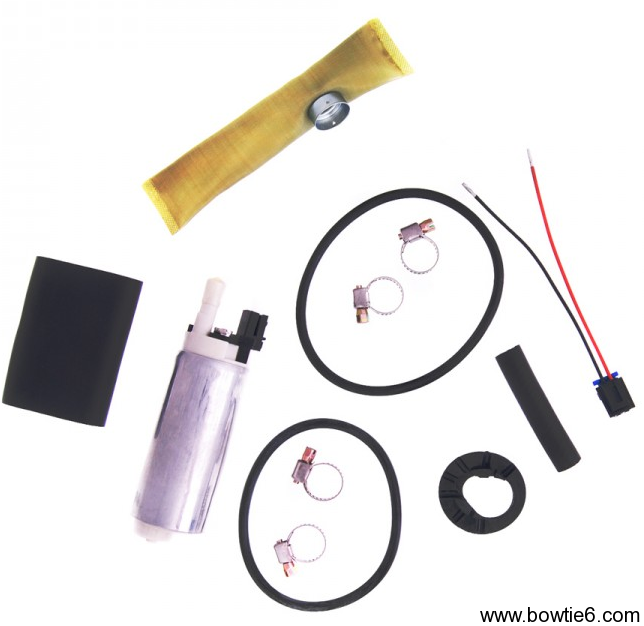
This is what the fuel pump looks like.  The pump has a “sock” that mounts to the input side.  This is a pre-filter.  The rest of the bits are the rubber isolation tube on the left and the wiring adapter.  This is all GM as fitted to Corvettes.

OK – there is a reason for all this.  If you look closely at the tank you see a protrusion at the very bottom.  Even though the tank is baffled, when doing heavy cornering fuel has a tendency to starve the pump.  We solved that by making a special lower compartment that will not allow that.  Kinda like a windage tray on an oil pan.

The fuel pump tank (the small box) as described previously contains a submerged GM high pressure fuel pump.  The box has a “lid” held by several screws and machined to hold Vitrol “O” rings to keep fuel from leaking.  This is a tight seal.  The rubber line at the top of the fuel pump box allows air to escape, allowing the box to always be full of fuel.

The tank holds about 15 gallons and the small box holds about another gallon (give or take).  The beauty of all this is the fuel pump box always contains fuel.  When taking turns at high speed this all now ensured no fuel starvation.

Of course all this comes at a price.  All this has taken up precious space in the trunk but then again, I don’t carry a bunch of wrenches and spare parts like many other owners of “originally” restored cars do.  Furthermore, the extra fuel capacity offers a much more respectable driving range:  I have already been able to get 350 miles of city driving from a tankfull and still had some fuel left in the tank before filling it back.  I am hoping that once I get bowtie6 on a long trip on an interstate, I can reach the 400 mile mark.  Not too bad huh?

One more picture showing the custom made aluminium battery box housing an Optima Red Top battery.  Behind the battery box is the Triumph “bleed” tank that is plumbed to the fuel tank filler neck and allows fumes to be routed back to the intake side of the engine.


bowtie6‘s Muffler

Looks like my last post about the muffler and exhaust has drawn some interest..

I’ve been asked for more info about the muffler.  Well here is the skinny:

Since the entire tubing is all stainless (this stuff was pricey) I figured the muffler should be stainless also.  The tubing is all 2.75″ and the muffler is stainless too.  This bad boy came from Speedway Motors and is called a “bullet muffler” (CLICK HERE for more info).  They have several options on finish.  Mine is the “non-polished” version.

Something to keep in mind:  as nice as this muffler is, it is not quite enough to tame the Ecotec.  When the VVT kicks in, the Ecotec really starts to wail.  That is why we are running the Supertrapp tips at the end of the pipe.  Speaking about the Supertrapps, I have been experimenting with the number of discs.  With Supertrapps, the more discs you add the less restrictive the exhaust is, at the expense of noise.  With less discs, it gets more muffled but backpressure increases.  Right now, I am using 12 discs – six on each tip – and this puts one hell of a smile on my face past 4500 revs.  I’ve ordered more stainless discs and plan to add at least two more per side.  We shall see how they turn out.