Author Archives: bowtie6

bowtie6‘s New Frame Takes Shape

Whew!  This has been a long week.

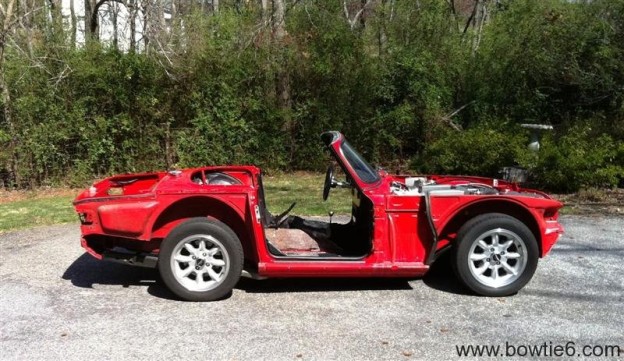
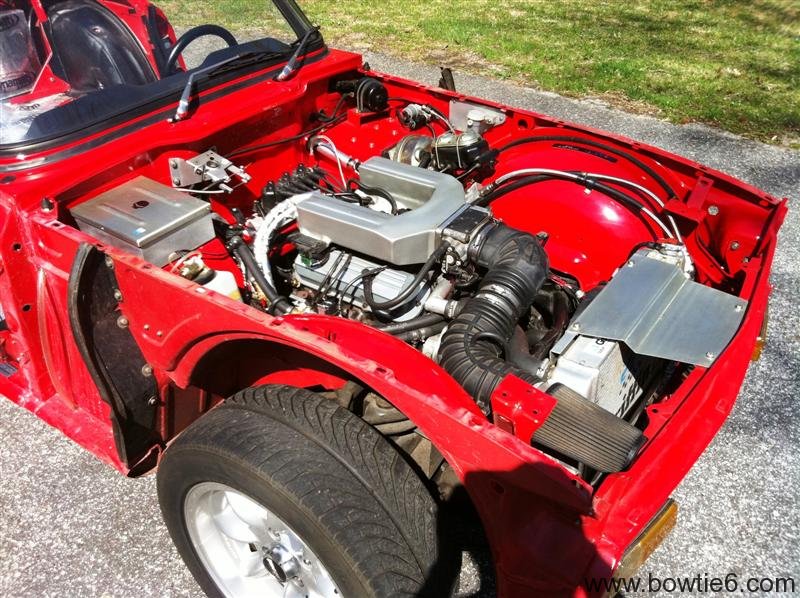
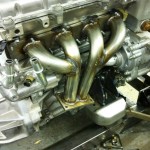
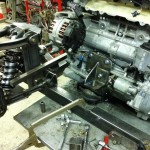
Worked on bowtie6 a little today.  The rear suspension came apart and took the transmission tunnel apart also.  Let me talk about the tunnel:  when the V6 was grafted into the TR6, we made an all aluminium transmission tunnel cover.  It is secured on a special square tubing edging that was welded to the floorboards.  My main concern with the Ecotec was that the transmission tunnel cover would be too small.  Well, by taking the tunnel off today we were able to determine there will be enough room.  We had to make room to run the exhaust pipes on the V6 and since the Ecotec dumps on the passenger’s side, we will have enough clearance.

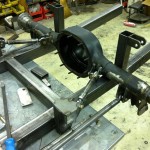
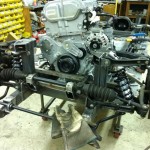
Then today’s good news:  My cousin Jim has made some extraordinary progress on the front suspension.  Here is a small gallery showing the new front section of the new made-from-scratch frame.  You can see the new front suspension towers and the new coilovers that are so trick!  With these guys in place, ride height will be adjustable and best of all:  no more spring compressors in order to take things apart.

If you look close enough, you can see the steering rack mounts  Yes, those are aftermarket rack mounts and they work quite nice.  Needless to say, the rack has been positioned in a very special location in order to prevent bump steer.  The rack is stock TR6 – they are nice enough.  The front suspension also shows factory rotors, however the calipers are uprated Wilwoods with four pucks each.  They have proven to provide very good stopping power.

Take a look:

bowtie6 Ready for Disassembly

DST starts today and we are ready for disassembly.  Should give me some extra time to work on bowtie6. Watching the last stage of Paris-Nice on Versus right now – they are riding in some crappy weather.  The attrition rate has been quite high…

Anyways, today I was able to get bowtie6 over to my cousin Jim Thompson’s shop.  We started further tear down in preparation of the body removal.  We were able to get the front suspension apart for the last time.  The SPAX adjustable shocks and Richard Good competition front springs came out and will be soon be up for sale.  The replacement coilovers have been purchased and they will be nice.  No more hassles with spring compressors and that alone is worth the price of the coilovers.

Don’t have pictures yet, but the new frame is coming along very nicely.  The front suspension towers are fully built and now that we have the “A” arms apart, the new attachment points will be made.  The steering rack will come out next and its location will be found so there is no bump-steer.

Here are some pictures right before we loaded what is left of bowtie6 onto a trailer….

bowtie6‘s V6 Engine

The engine formerly installed in bowtie6 was a 60 degree 3.4 litre V6 as originally fitted to 1994 GM F-bodies (Camaro/Firebird).  The engine was in its stock configuration to begin with, however during the 4 years I’ve had it installed I’ve done a number of “improvements”.

I’ll start by describing the unusual intake manifold.  The original manifold on the stock 3.4 V6 is very restrictive.  The throttle body and runners are very small.  My cousin Jim Thompson is a professional machinist and he can do wonders with a milling machine, lathe and a welder.  So we decided to do a little experiment…

First, we cut off the nose of the original stock intake manifold.  Then, the manifold was chucked on a Bridgeport milling machine and a few passes with a large endmill were made.  This exposed the intake runners and we were finally able to see just how small and restrictive they are.  So, the runners were further machined and cleaned up.

Basically what we ended up with was the bottom half of the stock intake manifold.  Pieces of aluminium sheet stock were cut and carefully tacked to the bottom half of the intake manifold.  Soon, a more even and much larger upper plenum was formed.  Seams were welded up and some trick work was done with a file to shape the edges and make it all look seamless.  I think the end result turned out really nice.

Then we replaced the small throttle body with one from the legendary LT1 V8.  The LT1 throttle uses twin buttlerflies and thus can keep up with the extra volume of the new intake.  Fortunately, the LT1 throttle body also uses the same type of throttle position sensor and idle air motor as the V6 does, so the ECM recognized all this without throwing codes.  The intake is also made in such a way that the MAP sensor still mounts to its original location and is connected to the intake via a small rubber hose.  Finally all vacuum lines are located in their factory locations.

The intake was then cleaned very carefully and several coats of high-temp silver paint were applied.  While tacky, I sprayed several coats of high-temp clear.  The end result functions as good as it looks.

So why go through all this trouble?

  • We wanted to experiment what would happen with a bigger intake and throttle body.
  • The engine needed the extra air volume.  This engine is running larger injectors, a hot cam, 1.6 roller rockers, headers and fully ported and polished heads.
  • Last but not least, because we can do it.

The end result is pretty impressive:  Throttle response is amazingly quick.  With the collection of engine modifications, the engine does not run out of breath as much as it used to.  Also, the engine revs in a much smoother way with a higher redline.  One could argue that some lower end performance was sacrificed for a much nicer middle and upper range.  Sure.  But when this engine pulls a 2200lb car (instead of 3500 as in the F-Body) that is a very acceptable trade off.

Engine Fitment in the TR4

A fact has been brought to my attention:  “Amazing that in the TR link, with all the hype about the engine, there is not a single pic of the engine in the car!”.  My bad.  Time to make amends; time to really document the engine in the car.  Some facts:

  • The engine is a 2.4 litre VVT ECOTEC from a Pontiac Solstice
  • The transmission is a five speed AISIN also from a Pontiac Solstice
  • The wiring harness has been lifted from the Solstice and modified.  It has been vastly simplified.  How?  RTFM.  Seriously, all the info is available in the Factory Service Manuals – trick is finding it.  😉
  • The ECM has been reflashed in order to disable VATS.
  • This ECM is fully programmable – in this case we have HPTuners on a laptop.  Right now, we are running the stock configuration – hopefully soon we will spend some quality time on a dyno and then tweak the thing.
  • The stock plastic intake has been replaced.  The intake you see in the pictures was all hand made from aluminium and welded to a flange in order to make the runners match the intake ports.  This is done for a reason:  the original plastic intake does not give enough room for the steering column in a TR4.
  • The stock throttle body with its fly-by-wire controls has been retained.
  • The exhaust manifold has been discarded.  Like the intake manifold, the header is all hand made from stainless.  This is also welded to a special flange in order to match the ports on the engine block.


As stated above, the throttle remains fly-by-wire.  There is nothing ‘weird’ about this.  Actually it is extremely fast and the throttle body reacts to small inputs as well as full throttle acceleration (done that many times).  Matter of fact, my wife’s HHR (it has a 2.4 Ecotec as well) has the same fly-by-wire setup and it is very responsive.  I have no problems running this furthermore this is the way more and more modern cars operate.

The intake and exhaust manifolds have been altered and this is done for a reason:  the body needed to remain intact.  There has been some work done to the tunnel though.  A new transmission cover has been made as well as the driveshaft cover between the seats.  I don’t have a way to show that since the TR4 is assembled now.  However when I put bowtie6 back together once his ECOTEC is in place, I’ll have better pictures to show of how that all fits.

If you have questions and/or comments, please make an entry here – I’ll try to answer back!  Keyword here is:  dialogue!  🙂

Dialogue…

I’ve received some private comments regarding the frame failure via email…

I’m all good with private messages.  Matter of fact, I really look forward to them.  However, I would like to remind you I’ve set this blog up to accept replies. At the end of each entry, there is a link appropriately named “Leave a comment”.  When clicked, you will be prompted with your name, email address (don’t let that worry you) and your comment.  The email address stays private and will not be used to do any spam mailings.  Your comment will then be put on a queue and will be moderated, with a reply from me.

The emails I have received would have made an excellent “conversation” that would have in turn been of interest to others.  My goal here is not to compete with the full blown forums (that would be way too ambitious).  Instead, I’m hoping we can establish some type of dialogue where folks can read and ask about some of the experiences I’ve gone through on this endevour of mine.  After all, if you didn’t find this of some interest you would not be here in the first place!  😉